This tutorial is for Ubuntu 11.10, however, it should be the same for other versions of Ubuntu (and derivatives, like edubuntu, kubuntu, lubuntu, and xubuntu) and other Linux distributions based on Debian.
However, no guarantee is made.
What makes Ubuntu very easy to use is the Ubuntu Software Center which allows users an easy way to select and install or remove packages (usually programs).
However, when you search the web looking for help with Ubuntu, often times you see something to the effect of:
Enter the following command:
sudo apt-get install lubuntu-desktop
While this is clear for those who know what it means, I believe the majority of Ubuntu users are those who want a simple to install and use Linux OS – they are not interested in lower level details of managing their system.
In most cases, you can enter the package name into the Ubuntu Software Center and install it that way. For example, if you found the instructions: sudo apt-get install lubuntu-core and didn’t want to use apt-get you could enter lubuntu-core into the search field of Ubuntu Software Center and select the appropriate package from there.
Advantages of using apt-get
When you use the Ubuntu Software Manager, all the details of the installation are hidden from you – you don’t know if you are installing just one package or twelve.
Using apt-get, you can see which packages are going to be installed. This also makes it easier to know which packages to uninstall if you uninstall later.
A common complaint about Microsoft Windows is that applications often install a lot of junk that is not removed when the application is uninstalled. Ubuntu isn’t any better in this regard. This is because installers and uninstallers are hard to write – when you uninstall you don’t want to accidentally remove packages or files that some other application is using, so uninstallers tend to be conservative and leave stuff behind.
Another advantage of using apt-get instead of the Ubuntu Software Center is that apt-get allows you to install multiple packages with a single command. With the Ubuntu Software Center you need to install each package separately.
For example, if I want to install the astronomy packages Stellarium and Celestia GNOME using the Ubuntu Software Center, I need to install each separately. Using apt-get, I can install both from the same command by separating them with a space:
sudo apt-get install stellarium celestia-gnome
What it is
The command is really two commands:
sudo– a command to grant super user access to the system. Ubuntu is configured to prevent administrative (or system level) changes to the operating system. This is a security measure.sudoallows a user to temporarily override this behaviour.apt-get– the Advanced Packaging Tool which allows users to install, remove, and update packages on their system.
Using apt-get
Instructions on how to open a terminal can be found here.
1) Type the command and press Enter (in this case, I am installing the package stellarium):

2) Type your password and press Enter. Note: as a security measure, your keystrokes are not echoed back to you. You will be typing, but see no feedback on the screen. While weird, this is normal.

3) Examine the install information (if you like):
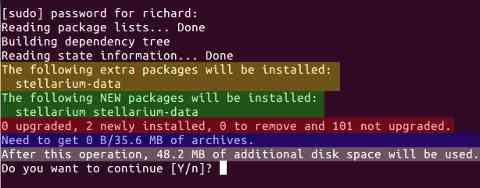
The install information shows you the following:
- Any extra packages that will be installed along with the selected package (yellow)
- The list of packages to be installed this includes the package you are installing along with any extra packages needed (green)
- A summary of (1) number of packages being upgraded, (2) number of new packages being installed, (3) number of packages being removed, (4) number of packages that are unaffected (red)
- How large the download will be (blue)
- How much disk space will be used by the installation (grey)
apt-get may display additional information, but, for this tutorial, it is not relevant.
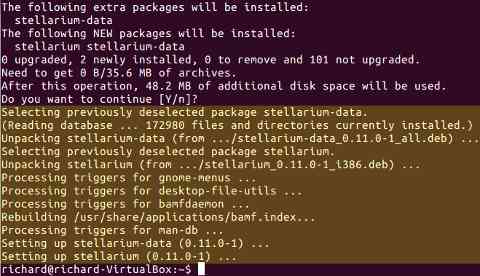
4) If you want to go ahead with the installation, press Enter. If you changed your mind, type n (upper or lower case – it doesn’t matter) and press Enter,
5) Wait for the installation to finish. During installation, you will see downloading information and installation information:
Thnks it really helped me a lot!………
You’re welcome and thanks for the feedback.
My first tentative step in using the terminal – and it’s a success! Thank you so much.
You’re welcome and thanks for the feedback.
It’s not really that difficult, but … if you don’t know it, then you don’t know it.
You might also consider using man pages to get more information. A man page is Unix’s / Linux’s equivalent of a help file. Often times, the help can be a little obscure, but it is better than nothing, sometimes it is very good.
At the command line, just type in:
man apt-getto get the documentation on the command
apt-get.You can then try out
man sudoto get more info on thesudocommand.Finally, if you are not interested in all the documentation, you can often follow the command with
--helpto get a brief synopsis of the command and options.At the command line, type in:
apt-get --helpto get some help on the command
apt-get.More commands support
-h, which gives a much terser help summary than--help.Hi, thank you so much for giving this detailed and easy description about the command ‘sudo apt-get’ here.
Thank you and you’re welcome.